

(A.K.A. Part Two of Operation Rebuilding)
posted by Beret
Ages: 6 and up
After my recent declaration that taking things apart is the best way to learn how they work, I feel a little sheepish announcing that YOU SHOULD NOT TAKE BATTERIES APART. All is not lost, though. Now that we know what is needed to make an electrical circuit–see part one: energy source, energy path, and energy receivers–let’s build our own battery and put it to work.
In order to make our battery, we need two different types of metal to be the electrodes. These are then suspended in an electrolyte, which is a liquid or gel that conducts electricity. For our project, a copper penny and a zinc-coated nail are the electrodes. When inserted into a lemon, the citric acid serves as the electrolyte solution. The energy does not come from the lemon, however. The energy comes from the chemical change in the zinc when it dissolves into the acid. Very detailed explanations for this electrochemical process abound. I think the clearest one is on wikipedia. And, if you are interested, there is information on the history of electrochemical batteries right here.

What you need:
- a few pennies
- galvanized nails or screws (galvanized means they have been dipped in a zinc coating. The zinc prevents corrosion of the iron or steel, but for our purposes, we need the zinc for the chemical change necessary to produce electricity)
- two or three lemons (two may work, but you may want an extra on hand just in case)
- insulated wires with the ends exposed or, if you are feeling extra fancy, the nifty little wires with gator clips on either end. These jumper leads are easily found at Radio Shack. Online you can buy them from Amazon or from hobby or educational sites like The Science Fair.
- a very low-voltage LED (dig around in the drawers at Radio Shack for one that needs 1.8 volts of power) OR
- a timer, calculator, tiny LED clock, or any small appliance that takes a single AA (1.9 volt) battery
Procedure for making a single cell battery:

1. Make a small cut in the lemon, and slide the penny into the slot. Allow the coin to poke out enough to be fastened to the clip. This piece of copper serves as the positive electrode, or cathode.
2. About two fingers away from the penny, poke the nail or screw into the lemon. Make sure that the two pieces of metal do NOT touch. The screw serves as the negative electrode, or anode. (see picture at the top of post).
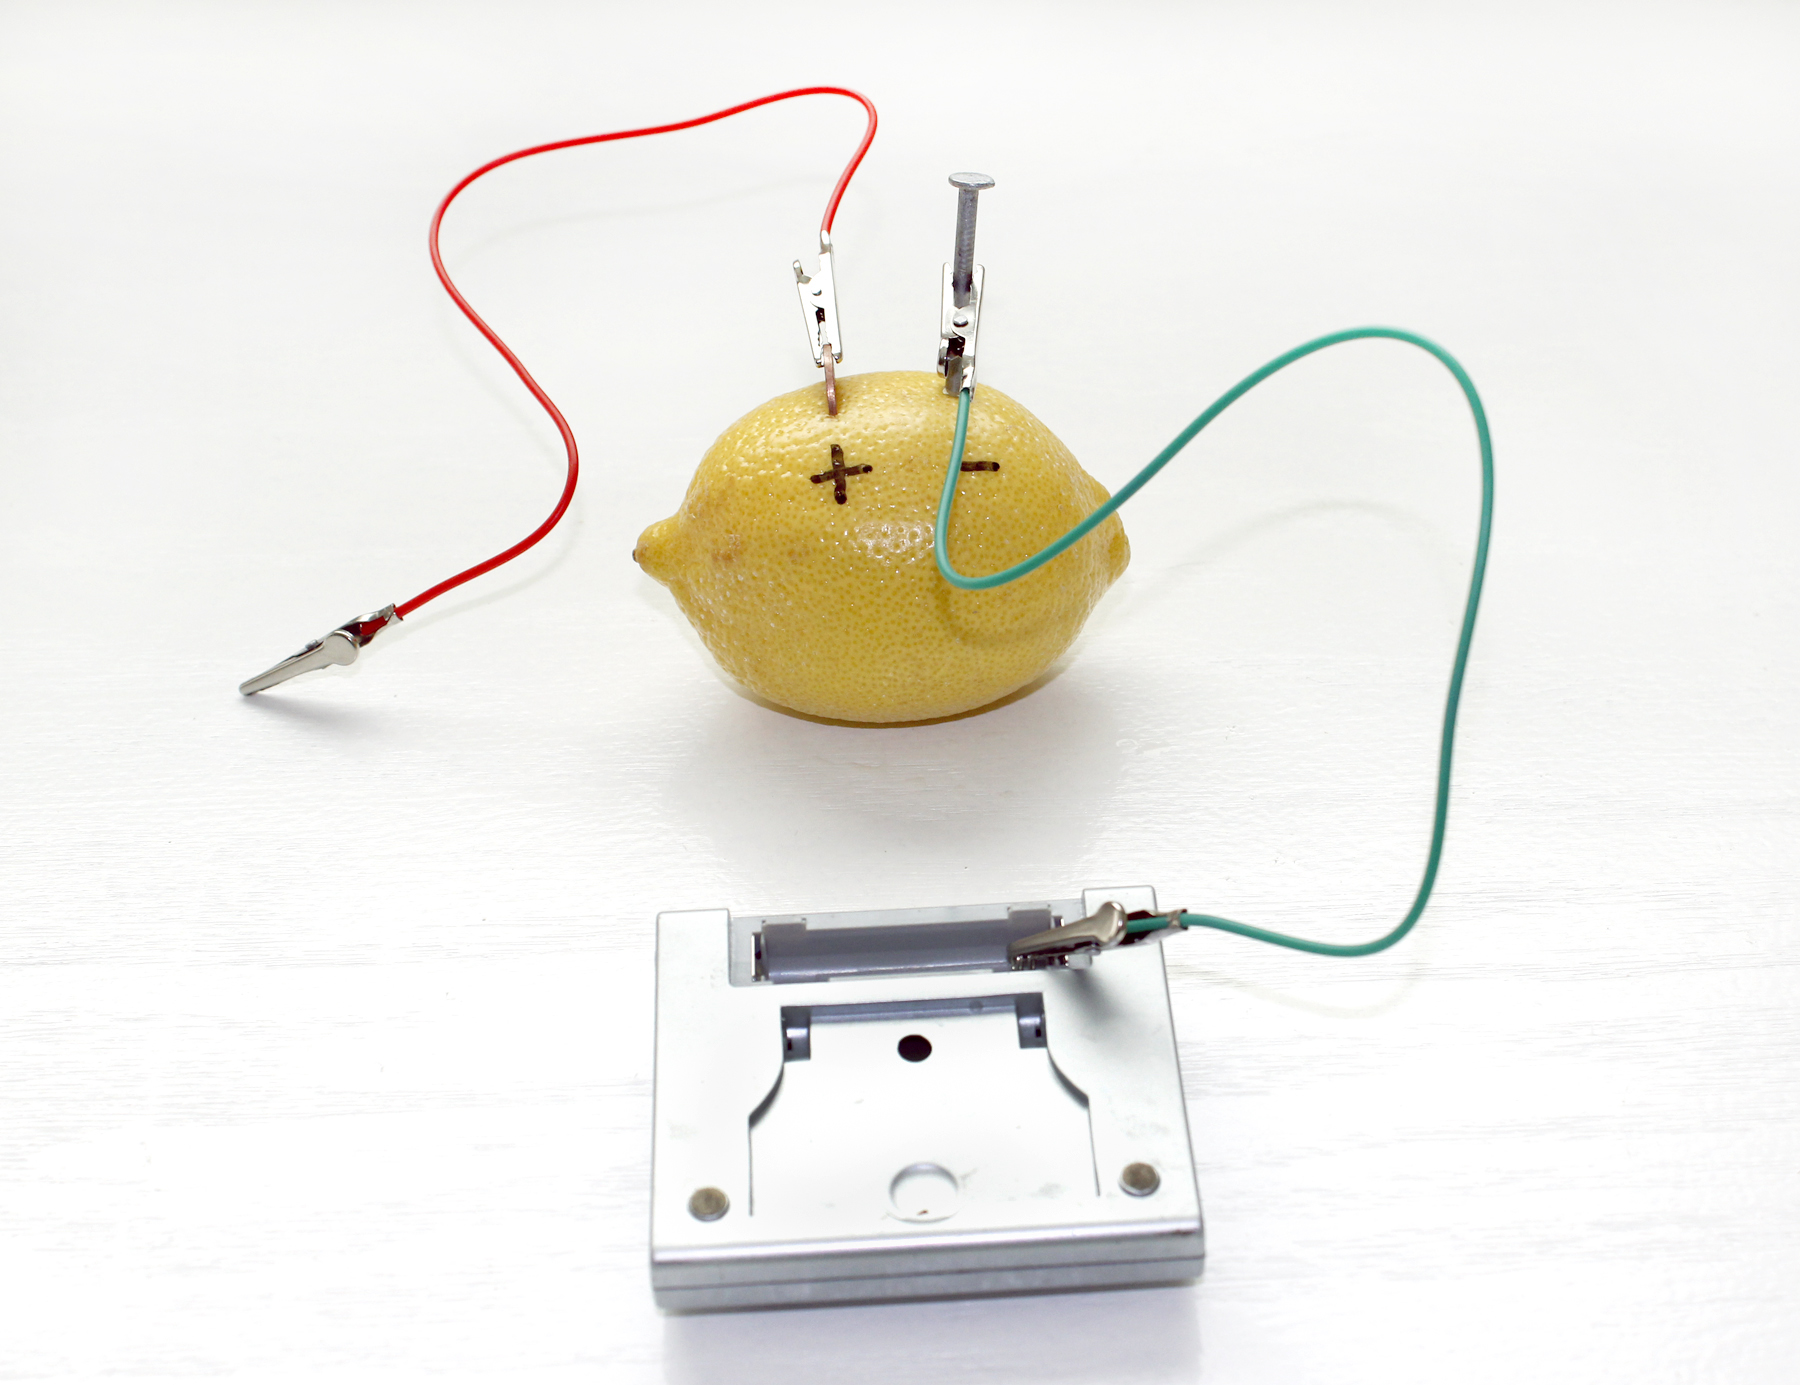
4. Attach one lead from the battery anode (the nail) to the negative side of the empty battery compartment (the spring) or the LED. On an LED, the negative lead wire is SHORTER than the positive. If you look carefully, the negative side of the bulb also has a flat spot at the bottom. Then, touch the lead from the cathode (penny) to the positive side of the battery compartment or LED. Voilà! A single cell! Anything happening? Wait a moment and/or turn off the lights to check for sure. Well, don’t lose heart. According to Wikipedia, a single lemon cell will only generate about 0.9 volts, which is definitely not enough current to light the LED bulb or the timer.
Connecting more cells to generate more power:
By connecting more cells into a series, you will add the voltage from each cell together to generate more power. Think about how you put batteries together in a flashlight, positive end to negative end, and remember to connect the negative electrode of one cell to the positive electrode of the next. You can even cut the lemon in halves or quarters and make separate cells out of each part. If you do that, be careful that your work area stays dry, however, because pools of juice can affect the power of the battery.
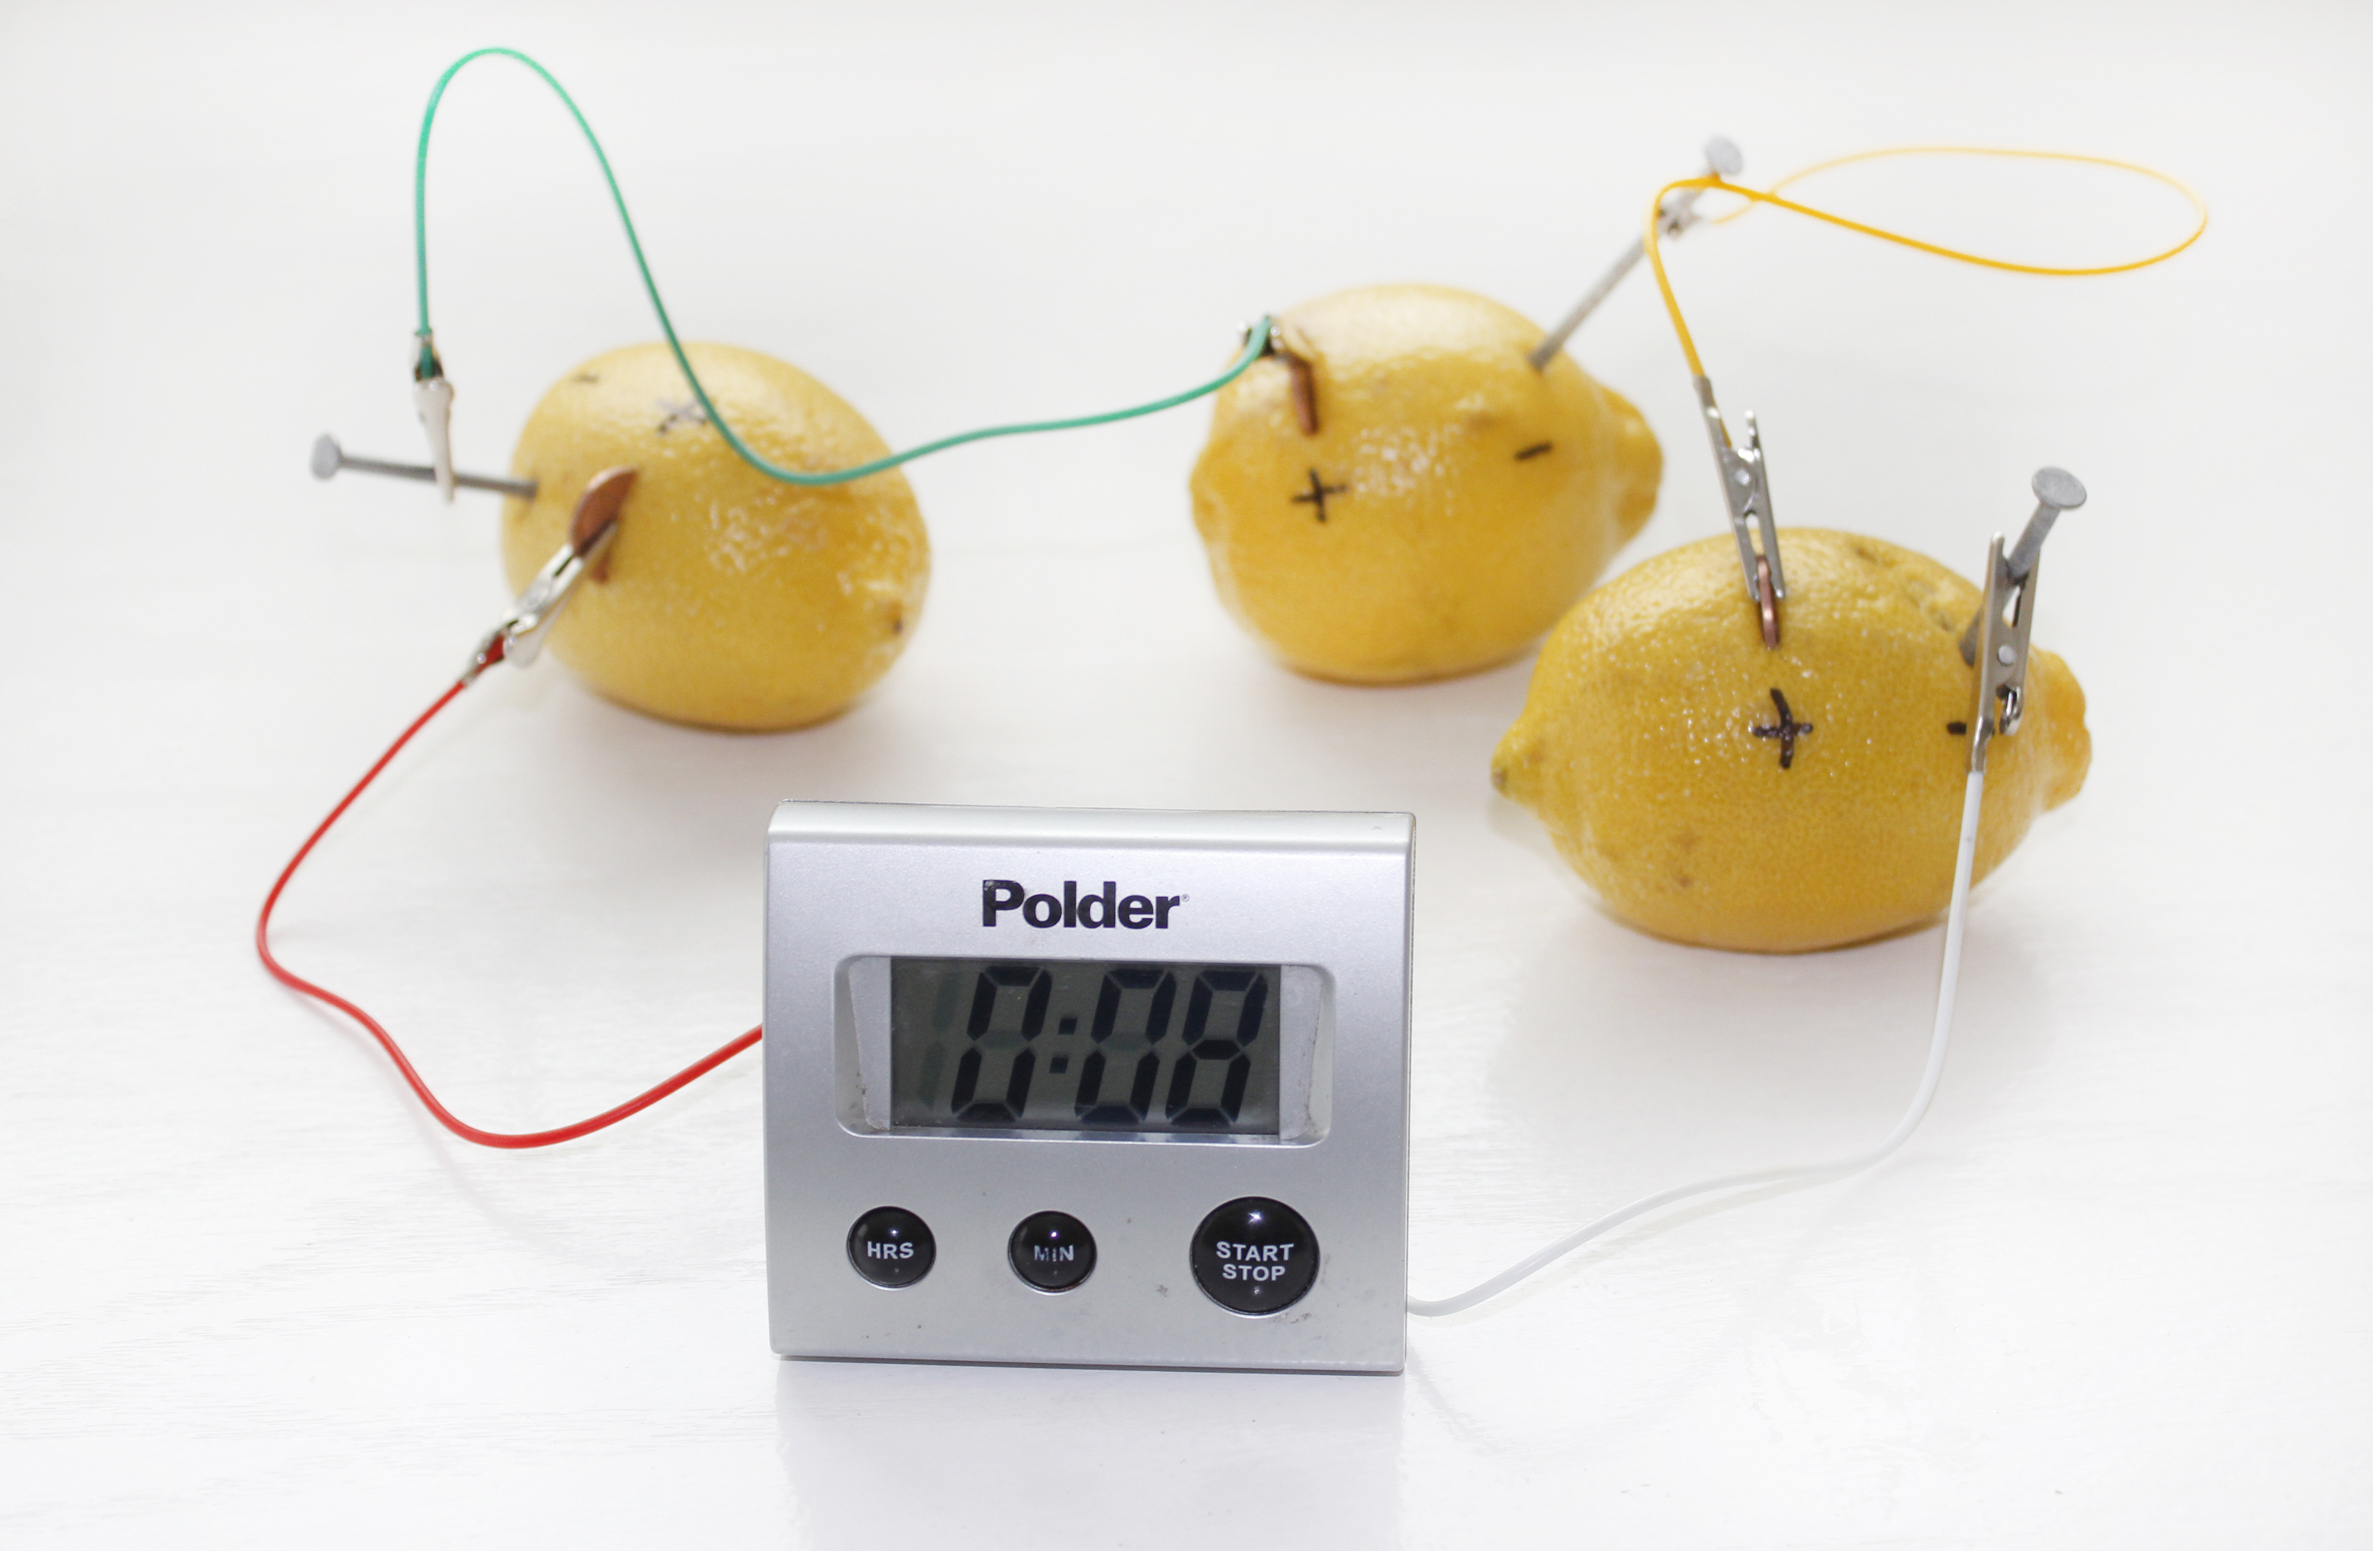
We found that two or three lemon cells in a series circuit had enough power to light the LED or run the timer. As I write this, our three lemon battery has been powering a tiny clock for three whole days!
Possible troubleshooting:
I feel compelled to mention that I read innumerable online testimonials from people who had trouble making a lemon battery. A lot of blame was placed on the penny.

- ©2013 Beret Olsen

Since 1982, when it became more expensive to mint copper pennies than the penny was actually worth, pennies have been made out of zinc with a very thin copper plating. Many people believe that the older pennies work better for this project because they contain more copper. I tried pennies from many dates before and after 1982, and they all seemed to work fine.
Also, much was made of the grime and patina on the penny, and how that might reduce conductivity. That may well be true. I didn’t have a volt meter to measure the difference between batteries built with dull pennies and those built with shiny, but I found the dull pennies to work just fine. It was fun to shine the pennies, though, so if you and your posse would like to do so, here is what I recommend. Although many different methods will work–including wine, salt, lemon juice, and vinegar–the hands-down fastest way to get a nice shine is to scrub the pennies with ketchup and an old toothbrush.
Additional resources:
Full disclosure, you can buy a potato clock kit at Radio Shack or online at Puzzlezoo.com. The thing is, we found it way more entertaining to do the project from scratch, using ordinary materials.
Lastly, here is a great YouTube video on making a lemon battery. It gave me a flashback to eighth grade shop class movies, but it shows the whole process very clearly. A middle schooler could probably watch it and do the whole project on their own. And, if you could get your hands on a volt meter, wouldn’t it be cool to measure the voltage of different fruits and vegetables? Other things to try for making a battery: tomatoes, potatoes, pickles, vinegar, bananas, even soda or sauerkraut. Good luck!

Soooo very cool! Thanks for sharing!
LikeLike
This is a fantastic post, and the sort of thing I wish more people would promote. I added your lemon image (with attribution) and a link back to this post in my latest article on batteries and battery technology. I looked at a number of other articles as well, but your article was by far the best. I also promoted it on several social media platforms I use. I hope it sends you some traffic.
Often my work as a writer can get dull and boring, so when I find gems like your site, I try my best to increase their exposure. This is a link to the article, with your link appearing at the bottom: http://blogcritics.org/a-glimpse-of-what-makes-a-battery/
LikeLike